
Road-trip 2020 II: The Southwest and Northwest
Maybe I am crazy, but this just happened, again…!
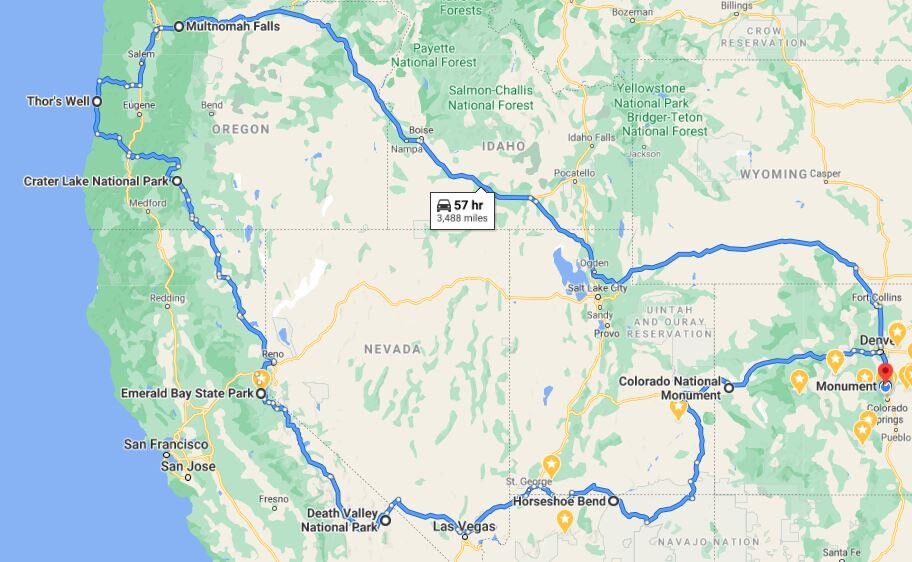
Mapping the route shows 3,488 miles and over 57 hours of driving time! The final trip ended up being 6,602 miles. It was a great trip minus the one big mistake I made that I did not realize until the end.
Many of the locations are similar to a trip that I took in February 2020 that totaled 5,891 miles and can be read about here. It was nice to get to visit some of these locations for a second time. Going to a location that you’ve previously been to allows you to go into the photo shoot with a lot more confidence as internet research can only get you so far.
The Route
My traveling companion on this trip was Benjamin Huseman.
We started out the trip planning to spend Friday - Sunday shooting within Utah and Arizona. Within 20-miles of driving, that plan disintegrated and turned into shooting Friday - Tuesday within Oregon, California, Arizona, and Colorado. Seems either we need to get better at planning or we plan perfectly as life is short. I’ve yet to determine which. Oh, one last note, within the extended date range, my wedding anniversary came and went, but that is a story for another time. Yikes! Anyhoo, back to the trip. First stop, Multnomah Falls, Oregon.

Leg 1: Monument to Multnomah Falls
On the first leg of our trip, Google Maps offered up flying times. Great…. This is going to be a long drive!

Columbia River Scenic Highway Marker (Image taken w/S8)
We chose to travel to Oregon based on a weather forecast we pulled up while driving. The forecast was for partly cloudy skies for a week! What!? A solid week of potentially great shooting conditions in Oregon! This was simply too much for us to pass up and was a pivotal reason for us changing our plans.
With our first destination being Multnomah Falls, Oregon, the most popular falls in the entire state of Oregon, we knew we had quite a bit of ground to cover, especially if we wanted to shoot other places and avoid crowds. After realizing that we both have wanted to shoot this waterfall, it wasn’t very difficult for our initial plans of shooting UT and AZ to change, especially considering the other locations that were in Oregon as well as that forecast!
With some rough back of the napkin calculations, we determined we’d need to drive through the night in order to get to the falls in time to both shoot the falls and still make it to our newly decided second destination of the day before sunset.
The drive took ~18 straight hours and had us arriving at the falls in the 0700 hour. The Falls didn’t open until 0900. Great…
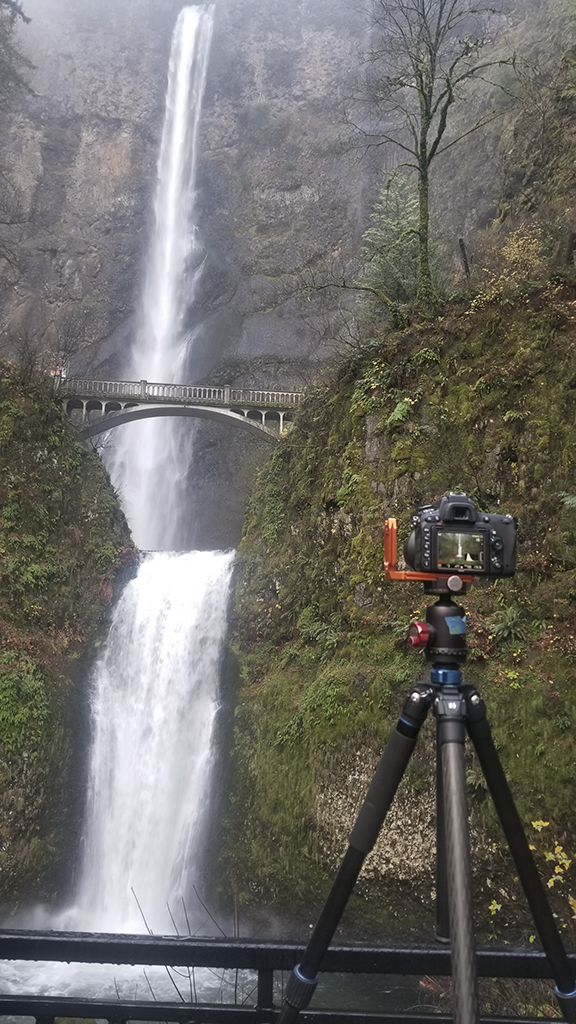
BTS (Behind The Scenes) - Multnomah Falls shooting location (S8)
I’d never shot Multnomah Falls before, so I was really unsure of what to expect. On a scale from 0-10, with zero being the least difficult and 10 being the most difficult, I found getting to the shooting location to be a one (1) and very accessible. The falls are directly adjacent to the highway, parking, and the path is paved/concrete. When I was there, they had a coffee stand out front along with restrooms/gift shop indoors. The path to the upper bridge was closed. Good. That made for fewer people to edit out of my photos! ;-)

A Beautiful Morning at Multnomah Falls
(Prints Available)
Nikon D750 | Tamron 24-70mm
24mm | f/2.8 | ISO 100 | 1s
Shooting Multnomah Falls didn’t really take that long. Had conditions been better, I am sure we’d have stayed a bit longer and stretched the creativity a bit. Another driving factor in not staying around was the fast-growing crowd.

Leg 2: Multnomah Falls to Thor’s Well
I was not surprised to see us pull up and be the first ones at the location or at least very close to being the first ones. Also not surprising was the crowd that slowly grew behind us waiting to get in to see the place, tho I am not sure I expected the crowd to be as big as it was. To be fair, I’d done absolutely zero research as we planned this on a whim. Regardless, the place was going to be packed. This basically forced us to think quickly and use our imagination as we walked up to the falls, chose a spot, and hoped for the best. If I could do it over, I’d adjust my composition just a bit. I suppose this means that Multnomah Falls is still officially on my List-O-Places-To-Shoot. Can you say, “Road-trip!?”
Moving on from Multnomah Falls, our second destination was Thor’s Well and our goal was to be there by sunset.

BTS at Thor’s Well
The drive to Thor’s Well was uneventful, just the way I like it. We pulled up to the location without much time to spare. I hopped out of the ride, grabbed my gear, and shot down to the water’s edge as I was concerned about the number of people that would be there with us arriving late.
I managed to find a composition that allowed me to both see into The Well a bit and not have a ton of people in my image. (See above image) With this composition, my goal was to shoot The Well with the distant high altitude clouds showing the coming sunset. There were tons of other compositions I had struggling for dominance within my head. I crossed my fingers and hoped that this one panned out as I knew I wanted to recompose a bit later as the sun sank towards and below the horizon.

Thor’s Well Just Before Sunset (Prints Available)
Nikon D750 | Tamron 24-70mm | 24mm | f/13 | ISO 100 | 3s
See my other available Prints (Opens in new window)
Landscape Orientation | Portrait Orientation | Square Cropped
The waves were crashing all around shooting spray easily 25’ into the air. My head was on a swivel, but my mind just wouldn’t let me recompose. I came for The Well. I could shoot spray and waves almost anywhere. I had to stay focused on what brought me to this location.
As the sun crept towards the horizon, I recomposed and prepared for what I hoped to be an epic sunset. The conditions were promising. One cloud a bit too far to the left or the right could squash the light along with my hopes, yet a mere minute or two later the conditions could become epic again. I’d have to wait and see how it played out. So much anticipation…!

BTS Thor’s Well at sunset (S8)
As the sun continued to set, it became more and more apparent that conditions would be at least acceptable. They may not end up being epic, but if you’ve ever traveled across state lines to a shooting location in the hopes of taking pictures, you know that sometimes merely acceptable is often a win.
Peering at a sunset/sunrise from behind a camera lens can honestly be a bit distracting from the standpoint of enjoying the moment. This is due to the fact, among other things, that the conditions are ever-changing. In a 24-hour period, you only truly get about 15-20 minutes of sunrise/sunset that are what I like to call “prime.” That is not to say that there isn’t an opportunity to capture lovely images outside of those timeframes. These are, to me, just the optimal times to be firing off images.
In reality, an individual only has so much mental capacity. If some of that capacity is dedicated to taking images and some of that capacity is taken up attempting to enjoy the moment, one of them must give ground to the other. Even if you are staring at sunset in a full attempt to enjoy the moment, there is a portion of that mental capacity that is still monitoring conditions from the perspective of, “Should I squeeze the shutter button now?” “Should I change my settings based upon the current conditions? Yes? No? What about now?”
A Photographer's Mental Capacity

Thor’s Well on a November Sunset (Prints Available)
Nikon D750 | Tamron 24-70mm | 24mm | f/5.6 | ISO 100 | 0.5s
I am not sure I will ever check Thor’s Well off of my List-O-Places-To-Shoot. I can’t imagine a time when I am in the area and thinking, “Na, I don’t want to shoot The Well today.”
With that being said, I am quite happy with the conditions I was presented with while in the area. I have been once before in much gloomier conditions. Both provide opportunities for great photography. Having shot gloomy conditions in the past, I was hoping for something a bit warmer on this trip. Mother Nature and her elements didn’t fail to provide.

Leg 3: Thor’s Well to Crater Lake
We began wrapping up shooting as it was now getting dark. Our next location, Crater Lake, was a huge bucket-list item for each of us. I always dislike getting to such a place and not knowing exactly where I want to shoot from. Even worse is looking for a shooting location in the dark. Since we were looking to shoot sunrise, we both knew we’d be doing just that, searching out our compositions in the dark.
Worst-case scenario, this trip to Crater Lake would turn into a scouting trip for another time’s adventure. With that being said, there was a high probability that this trip would be positive in one way or another.
The morning of my Crater Lake shoot didn’t start off well, but I didn’t know it yet. It appeared, at first, that it all started off quite well. It was quite a cool morning at about 15°, but I was warm. There wasn’t much in the way of cold weather gear that I was leaving behind in the vehicle. We each grabbed our snowshoes just-in-case they became necessary. It’d be better if we didn’t need them but I’m positive when I say that we both sure would hate to need them and not have them!
About 1/2 mile down the trail I went to pull out my phone so that I could map where we were vs where I thought I’d like to be. Ugh, I did not have my phone with me. I left it in the vehicle. No worries tho as Ben had his. We used it to roughly get into position for the morning’s coming sunrise.
Typically, I like to take a Behind The Scenes (BTS) image in an effort to show a different perspective on the composition that I am shooting. Well, since I did not bring my phone with me, and that is what I usually use for BTS images, there’d not be one for this shoot. This really isn’t a big deal, but on this particular morning, I sure wish I had it!
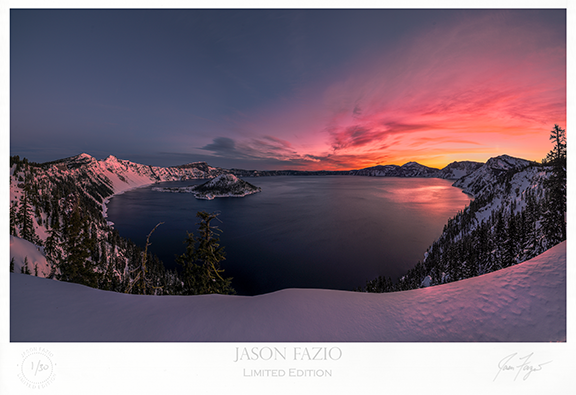
Crater Lake at Sunrise (Prints Available)
Nikon D750 | Rokinon 14mm | 14mm | f/11 | ISO 100 | 1/8s | 8-Shot Pano
The sunrise could not have been more spectacular! The way I felt that morning, the rest of the trip could 100% not happen at all and I’d still have been satisfied.
First off, the view looking out over Crater Lake is amazing all by itself. Add to that the rising of the day’s sun and the view is off the charts and one that I recommend everyone see for themselves at least once in their lifetime. This particular morning’s strawberry sunrise reflecting off of the southeastern clouds, the lake, and the undisturbed snow was a sight to see!

A Crater Lake Sun-Kissed-Peak Sunrise (Prints Available)
Nikon D750 | Tamron 24-70mm | 24mm | f/2.8 | ISO 100 | 1/8s | 9-Shot Pano
Not sure what I was thinking with the settings in the above image. I look back at them and am unsure of what I was thinking at the time. Maybe I wasn’t. Maybe the setting had me scrambling to take a shot and put me in a state where actual thought progression wasn’t a thing. Who knows.
In the end, I think I survived the slight misstep. Honestly, it really is nothing “major,” but as I mentioned earlier, when you travel out of state and you end up getting great conditions, you do not want camera settings to be the reason that you do not come home with “the shot.” Luckily, again, I think I survived the misstep, tho mostly due to the wide-angle lens and the distance of the subjects.
With the day’s sunrise having passed, it was time to head towards our next destination only, as you might have guessed, with a bit of a detour. I know what you are thinking. You are thinking, “There’s no way these guys deviated from their plans. They always stick to the plan.” Well, if you thought that, you’d be wrong. Ben and I are like a couple of squirrels.
While heading to our next destination, this bright and shiny object was poking up into the sky and lured us in like moths to a flame. The flame’s name, Mount Shasta.

Leg 4: Crater Lake to Mt Shasta
After a brief search via Google Maps for potential places to shoot a reflection and a little bit of debate, we ended up at Lake Siskiyou. The water in the lake was quite low. From the looks of where the water had been in the past, we were able to walk pretty far out “into the lake” before we ever met the water’s edge.
All in all, it wasn’t the most relaxing hours that we spent behind the camera as we were practically joined by a group of people who were obviously not there for the peace and quiet that the location could have offered. In the end, staying around for the Shasta Sunset ended up being a pretty good decision.
Ha! Who needs a plan!?

Mt Shasta at Sunset (Prints Available)
Nikon D750 | Tamron 24-70mm | 52mm | f/11 | ISO 100 | 13s

Mt Shasta at Sunset (Prints Available)
Nikon D750 | Tamron 24-70mm | 38mm | f/11 | ISO 100 | 8s | 2-Shot Pano
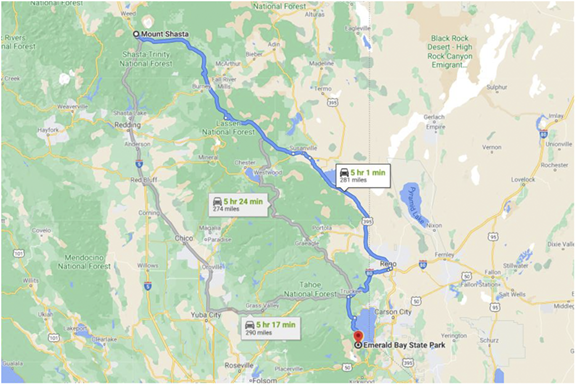
Leg 5: Mt Shasta to Emerald Bay
The morning’s sun wasn’t going to wait around for us, so we shot sunset at Mt Shasta and quickly hit the road for another 285 miles. Our destination, Lake Tahoe, CA.
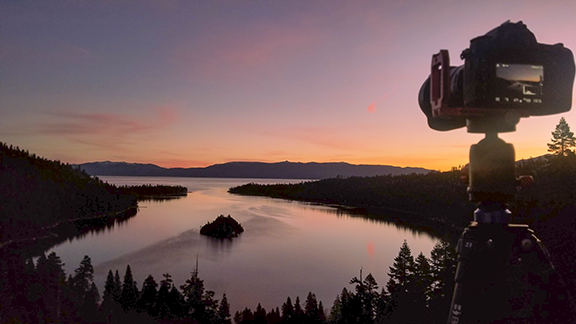
Emerald Bay BTS (S8)
We managed to make pretty good time on our way to Tahoe. We arrived in the night, but the moon was bright enough that we were able to scout out a location before catching a few zzz’s.
The morning came quickly. We weren’t the only ones with the great idea of shooting the sunrise seen above as we were joined by a couple of other photographers. Regardless, the morning was quite nice other than it being a bit on the cool side. The waters were calm for the most part and had yet to freeze, so we were greeted with a nice reflection of the day’s first light. Morning’s like this are always a nice way to start the day.

Emerald Bay in Pastel (Prints Available)
Nikon D750 | Tamron 24-70mm | 26mm | f/11 | ISO 100 | 1/8s
The above image was fun to shoot. Watching the sun slowly begin to light up the scene in front of me, turning the sky to blue and the clouds to pink, was quite nice! I was its biggest fan! “Go sun!” “Light up that cloud over there! Oooh! Over here, light up this cloud over here!” All in all, I am proud of the work the sun did on this particular morning. Good job, sun! ;-)
There was little doubt in my mind on where I wanted to go next. This next place is quickly turning into one of my favorite places to shoot. It feels like there are infinite compositions available. All you’ve got to do is find them. This place is none other than Death Valley, CA.

Leg 6: Emerald Bay to Badwater Basin
Between the Racetrack on one far end of the park to the volcano, to the dunes, Badwater Basin, and everywhere in-between, there is just so much to see in Death Valley.

Badwater Basin Near Sunset (S8)
The stop into Badwater Basin began with a walk down to the salt flats at a decently rushed pace. We got to the location a bit later than I had hoped and the trek out to a decent shooting location takes easily 20+ minutes. Meanwhile, the sun is sinking pretty rapidly. Regardless, I manage to get a couple of compositions.

A Badwater Sunset: Moments Before (Prints Available)
Nikon D750 | Tamron 70-200mm | 70mm | f/11 | ISO 100 | 1/25s
The textures in the salt flats at Badwater are mesmerizing! According to the informational board located at the basin:
The vast, surreal salt flats of Badwater Basin change constantly. Salt crystals expand, pushing the crust of salt into rough, chaotic forms. Newly formed crystals ooze between mudcracks, stretching strange patterns on the surface of the salt flat. Passing rainstorms wash off the windblown dust and generate a fresh layer of blinding white salt. Floods create temporary lakes that dissolve salts back into solution, starting the process all over again.

A Badwater Sunset: Moments Later
(Prints Available)
Nikon D750 | Tamron 24-70mm
24mm | f/11 | ISO 100 | 1/4s
The next morning came quickly. I got up a bit early in the hopes of getting a head-start on the sun. I wanted to walk pretty far out into The Basin in order to get closer to the distant mountains; I wanted them to appear larger in my image than they had in previous images from a previous trip.
As I walked out, I had plenty of time to think. Plenty of time to visualize compositions. I began to replay the prior evening’s compositions in my mind. I definitely liked how the large salt/mud formation wandered off into the distance of the image. I wanted to find something like that only I wanted the main portion of the mountains to be a distant focal point that the wandering salt/mud formation would lead the eye towards. I walked on, passing many great compositions along the way, in the hopes of finding the composition in my mind.
After walking for an hour, the mountains were indeed becoming larger and ever more present but the salt formations were becoming less desirable. My mind wandered back behind me to previous decent compositions I had seen on my walk. I knew I’d never be able to find them again, but their presence moved from the back of my mind to the front exponentially with every step I took towards the mountains. I had to turn back.
After turning back, I walked back the way I came for about 30 minutes before finding a decent composition just as sunrise arrived. This wasn’t how I envisioned my morning going, but I was at least happy to have found a composition that I felt would make an interesting image. The results of that long and arduous search can be seen below.
Hidden Fun: Can you find Ben in the image below? (Ben, don’t say that I never take your photo.)

A Badwater Sunrise: Just The Tips (Prints Available)
Nikon D750 | Tamron 24-70mm | 26mm | f/11 | ISO 100 | 1/8s
We, or should I say “I", learn best from our/my mistakes. While I do not consider any images from my last visit to the Badwater Basin a mistake, there were things that I wanted to “improve upon.” One of those things was to make the mountains a bit more prominent in the image. Comparing an image from my last visit (seen below) to the image above, I did manage to do that, but not as much as I wanted and not in the manner that I wanted. Instead of getting closer to the mountains, I ended up backing back up away from them in an effort to shoot a composition that I felt worthy of the setting. I ended up bringing the mountains a bit closer via a 24mm focal length vs last time’s 14mm focal length.

Badwater Basin as seen on a previous trip. (Prints Available)
Nikon D750 | Rokinon 14mm | 14mm | f/11 | ISO 100 | 1/8s
After meeting Ben back at the vehicle, we loaded up and hit the road. Our next destination was in Arizona and we had quite a few miles to cover before sunset. It was possible to get it done, but getting there was going to be close. Either way, there’d be no way we could make it there before the shadows crept over the canyon walls. “What canyon walls,” do you ask? Why, none other than the canyon walls of Horseshoe Bend of course!

Leg 7: Badwater Basin to Horseshoe Bend
There is a lot of photography that I want to do in the area around Horseshoe Bend but, with it basically in my backyard (it’s a 10-hour drive), we decided to simply hit The Bend and move along from there. Ben had not been before, so it was nice to be able to have him lay eyes on the area. Neither of us was under any illusions that we’d come back with an award-winning image or anything as the conditions were not going to afford such an opportunity, but being able to see the place first-hand is invaluable.
I snapped an image with my phone and mentally began planning the morning’s shoot in our home state of Colorado. Ben snapped a few with his Sony and seemed glad to have been able to see the place.

Horseshoe Bend (S8)
Here are a couple of images from my previous visit to The Bend. On this previous trip, I arrived for a sunset shoot and stayed for a Sunrise shoot. For the sunset shot, I was there most of the day in order to capture light down in the canyon.

Horseshoe Bend at Sunrise taken during a previous visit (Print Available)
Nikon D750 | Rokinon 14mm | 14mm | f/11 | ISO 100 | 1/15s

Horseshoe Bend at Sunset taken during a previous visit (Prints Available)
Nikon D750 | Rokinon 14mm | 14mm | f/11 | ISO 100 | 1/25s
After wrapping things up at The Bend, we set our sights on getting back to Colorado. A lot has to go right on road-trips like these. Setting aside all of the normal contingencies involved with traveling, as a photographer, one of the main things you want to go right are the shooting conditions. On this particular trip, the further from the coast we got, the worse the conditions became.
Now, I do not mean to say that they were inclement, I mean to say that they were becoming boring. Heck, I didn’t even shoot at Horseshoe Bend because I knew I’d not want the image that came from the shoot. A quick check of the cloud conditions at our final destination had us cautiously optimistic.

Leg 8: Horseshoe Bend to CO Nat’l Monument
Pulling up into Colorado National Monument, CO, our next planned shooting location, found us scoping out compositions in the dark. Not recommended.
One thing that does help is technology, specifically today’s modern cellphones and apps like Photopills and Clear Outside. With the help from those two, our optimism began to fade, as we were able to figure out what cloud cover “might” look like and where the sun would be coming up from and get a good guess as to what it might do within the canyon.
Just as predicted, the clouds moved off a bit more to the East than I would have liked. This represented a couple of problems. One, I was not going to get the sky I wanted in my image, again. Two, the clouds just might snuff out any possibility of a decent sunrise altogether as they were piling up over towards the East with me wanting to shoot West.

BTS at Colorado National Monument (S8)

Colorado National Monument Sunrise
Nikon D750 | Rokinon 14mm | 14mm | f/11 | ISO 100 | 1/80s

Leg 9: CO Nat’l Monument to Home
This was a great trip and there is absolutely nothing in my power that I would change about it. With that being said, it wasn’t perfect. It all went pretty well, but…..
Not everything goes well all of the time. Trust me, there’s plenty that I am leaving out of this blog from this trip. After all of the travels, and once I got home and began editing images, I realized I made a terrible mistake.
“I literally just realized that I shot a 3,600 mile trip in JPG.”
Meaning well, I spent some time before the trip cleaning my camera. One of the things that I did while cleaning was set my camera to shoot in JPG. I did this so that I could clean the camera and then shoot an image of a bright white piece of paper and be able to quickly transfer the image to the PC. Upon viewing this image, I’d be able to visualize where any remaining dust spots were on my mirror or sensor. This worked great with one problem, I forgot to change my settings back to RAW after the cleaning.
I ended up shooting everything on the entire trip in JPG instead of RAW. This, unfortunately, severely limited my post-processing capabilities. Fellow photographers, please, learn from my mistake.
Well…., guess I better redo the trip! Ony this time, make sure my camera is set correctly. ;-)